今天刚好有这个需求研究了一下,发现ffmpeg就可以实现。
$ ffmpeg -f gif -i infile.gif outfile.mp4
Mark一下
今天刚好有这个需求研究了一下,发现ffmpeg就可以实现。
$ ffmpeg -f gif -i infile.gif outfile.mp4
Mark一下
还在用ISP给的DNS?有没发现一些网站上不去了?
试试下面几个公共DNS服务器:
首选(联通):123.125.81.6
备选(联通):140.207.198.6
如果碰上一些MP4中的音乐特别好听的,想转成MP3的话怎么办?
用ffmpeg就可以实现:
ffmpeg -i a.mp4 b.mp3
还可以加 -b:a 192k 来指定码率
更多参数可参照:https://trac.ffmpeg.org/wiki/Encode/MP3
1) If RRAS based VPN server is behind a firewall (i.e. a firewall is placed between Internet and RRAS server), then following ports need to be opened (bidirectional) on this firewall to allow VPN traffic to pass through: –
2) If RRAS server is directly connected to Internet, then you need to protect RRAS server from the Internet side (i.e. only allow access to the services on the public interface that isaccessible from the Internet side). This can be done using RRAS static filters or running Windows Firewall on the public interface (or the interface towards the Internet side). In this scenario following ports need to be opened (bidirectional) on RRAS box to allow VPN traffic to pass through
Note: Please DO NOT configure RRAS static filters if you are running on the same server RRAS based NAT router functionality. This is because RRAS static filters are stateless and NAT translation requires a stateful edge firewall like ISA firewall.
Do not forget: If you enable Windows firewall or RRAS static filters on the public interface and only enable VPN traffic to pass-through, then all the other traffic may be dropped. For example, if the same server is running as a mail server facing internet or a DNS server or a reverse web proxy server, then you need to enable the ports used by those services explicitly. For further details, refer to this article: http://blogs.technet.com/rrasblog/archive/2006/07/06/enabling-rras-drops-all-other-traffic-except-vpn-traffic.aspx
Ref: https://blogs.technet.microsoft.com/rrasblog/2006/06/14/which-ports-to-unblock-for-vpn-traffic-to-pass-through/
另外如果L2TP服务器是在防火墙背后的话,Mac可以连,但是Win连不了。这个时候需要改Win的注册表:
Windows Registry Editor Version 5.00
[HKEY_LOCAL_MACHINE\SYSTEM\CurrentControlSet\services\PolicyAgent]
"AssumeUDPEncapsulationContextOnSendRule"=dword:00000002
Ref : http://support.microsoft.com/kb/926179
Ubuntu好像自12.04以后,就把定制的dnsmasq用作自己的DNS解析服务。只绑定在127.0.0.1上面。
但是当你安装了完整版的dnsmasq以后,却发现这个定制版的dnsmasq导致无法在127.0.0.1以外的IP上提供服务。
经过多方研究,发现经过如下两步操作以后,dnsmasq的完整版就可以完美运行了。
After=network-online.target
Wants=network-online.target
这样的目的是防止dnsmasq先于网卡前启动,导致网卡绑定失败。从而需要每次手工重启dnsmasq服务。
好了。难者不会,会者不难。这样就可以完美解决Ubuntu下面安装试用dnsmasq的问题。
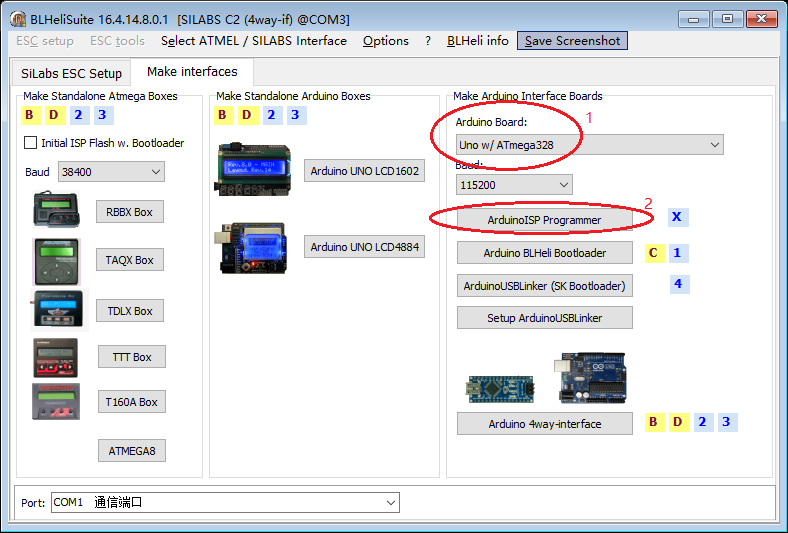
手上好多个EMax12A的电调,老是感觉不顺手。研究了一下发现有办法可刷BLHeli的固件,好消息。说动手就动手。
首先下载BLHeli Suite -> https://www.mediafire.com/folder/dx6kfaasyo24l/BLHeliSuite
然后拿出Arduino UNO接上电脑,打开BLHeli的Make interfaces功能。
最近在Ubuntu 16.04上实现了使用XRDP远程连接Unity桌面。这样的话使用Win自带的RemoteDesktop就可以连接Ubuntu的Unity了。
下面把步骤写下~
OK!搞定!就这三步就可以实现XRDP连接Ubuntu Unity。怎样?简单吧?
不过这个方法也是bug的,目前已知的bug是:
参考URL:http://c-nergy.be/blog/?p=9962
2020-05-28 更新
这个方法感觉还是麻烦了些,而且还有BUG导致Logout菜单等等看不见。最好的办法还是用Mate桌面,相关代码如下:
sudo apt-get install xrdp

sudo apt-get update

sudo apt-get install mate-core mate-desktop-environment mate-notification-daemon

sudo sed -i.bak '/fi/a #xrdp multiple users configuration \n mate-session \n' /etc/xrdp/startwm.sh

sudo ufw allow 3389/tcp大疆精灵3和大疆悟的图传都只有8个默认通道,有时候会因为受到外界干扰飞行的时候图传中断,是个很蛋疼的事情。可能有些模友还不知道,其实Phantom3的图传通道还是可以破解的,inspire 1理论上也可行,因为图传用的是同一套方案。
破解方法非常简单,安卓就是把附件里面的这个.DJI.configs文件释放到 \Android\data\dji.pilot\files
iOS的话就是直接把这个.DJI.configs文件放到APP目录下面。
搞定以后打开DJI GO,就会发现图传已经可以选择32通道了。但是注意只能选手动指定通道,不能选择自动。
破解32信道以后,只要有遥控信号的时候,图传就不会消失。不然有些地方干扰大了,会造成图传卡顿,或者消失,但遥控信号依然受控。
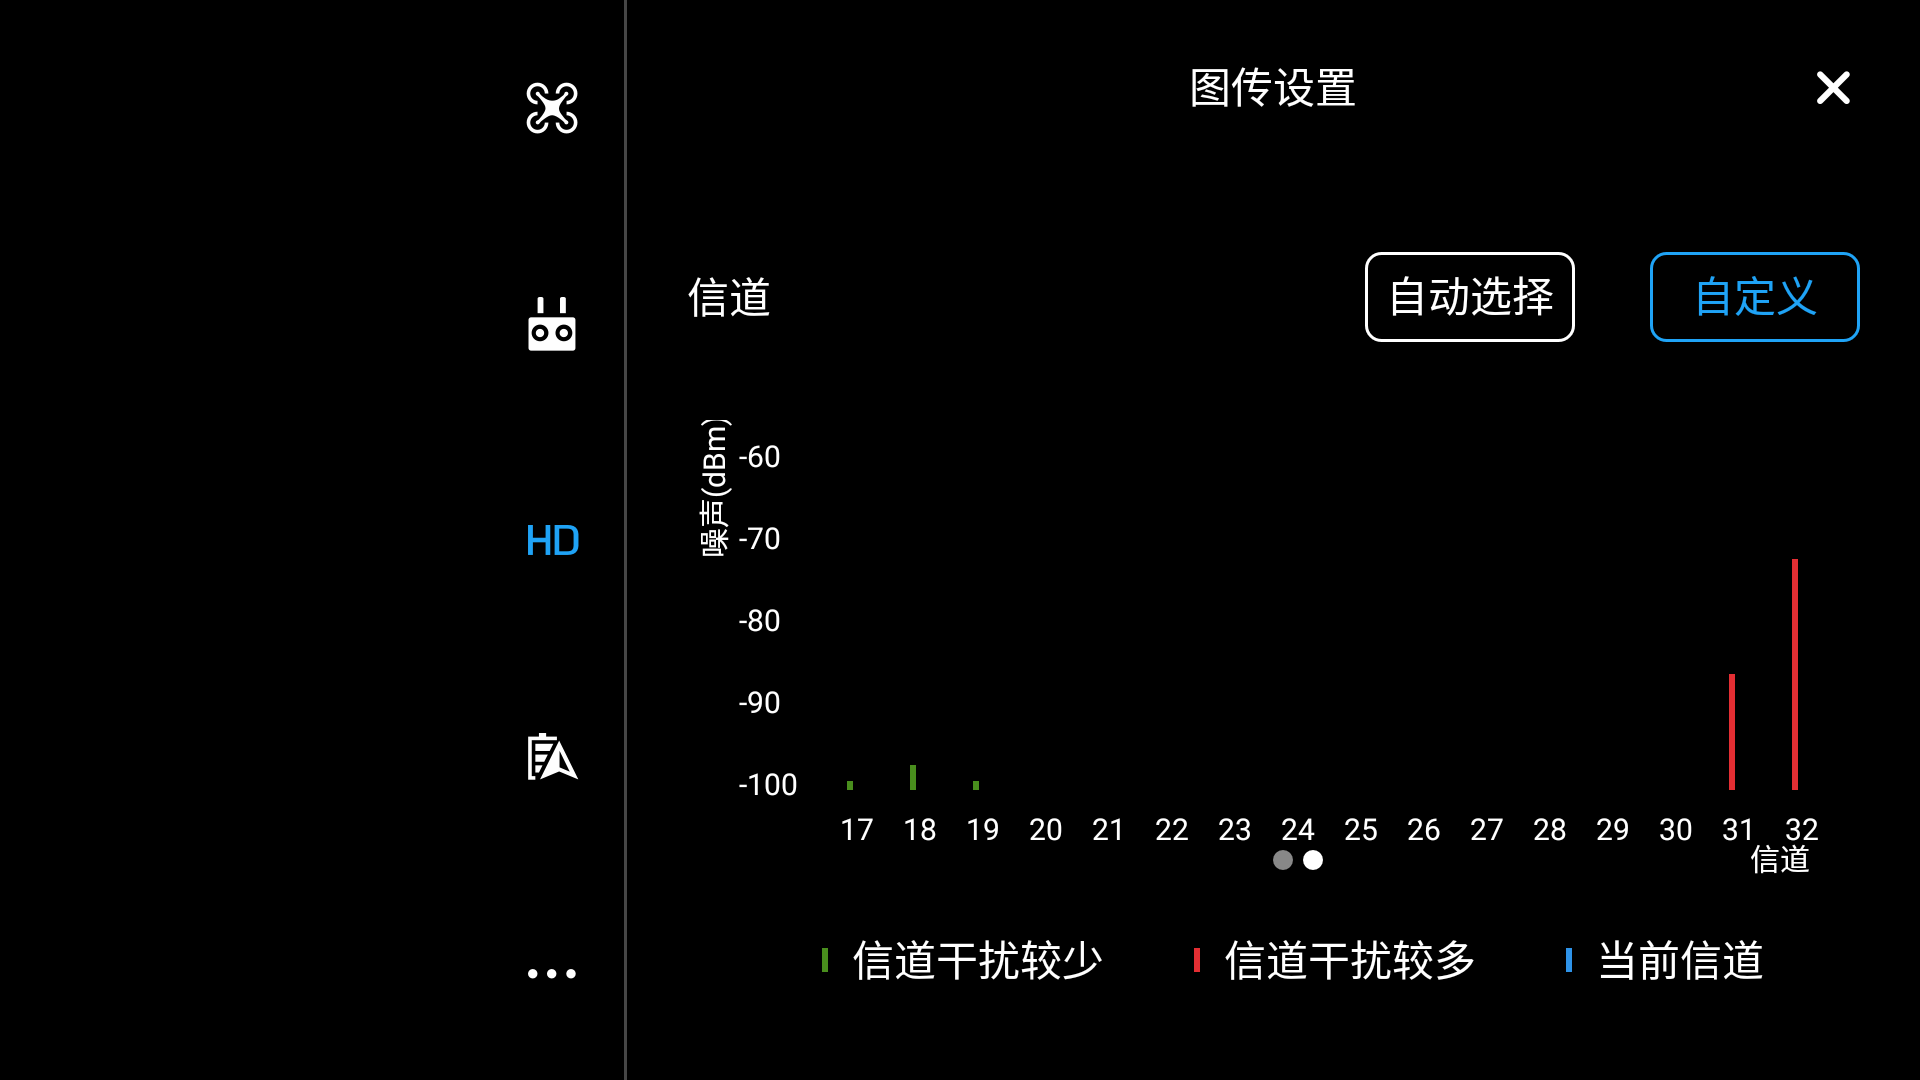
下载:32channel
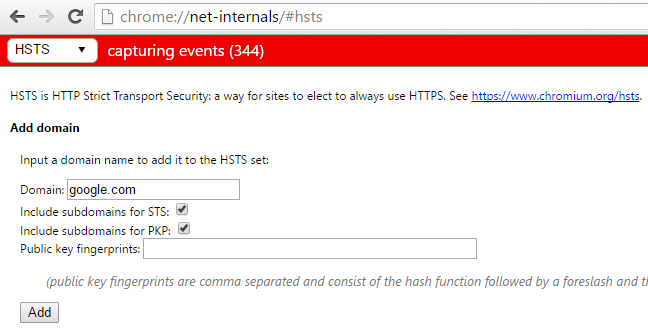
已经可以Ping通Google.com或者Google.com.hk了。但是怎么还是不能打开? 原来是跳回到http了。
要强制https的话,以Chrome为例。可以打开 chrome://net-internals/#hsts
在 Domain 栏里,输入 google.com或者google.com.hk,并勾选下面的两个复选框,点击 “Add” 按钮即可。
强制 Google 网页快照使用 HTTPS,输入 googleusercontent.com。
强制 Google APIs 使用 HTTPS,输入 googleapis.com。
当然如果你嫌这个操作比较繁琐的话,可以安装插件HTTPS Everywhere。
1、查看系统
[root@localhost ~]# cat /etc/issue
CentOS release 6.6 (Final)
[root@localhost ~]# uname -a
Linux localhost.localdomain 2.6.32-042stab106.6 #1 SMP Mon Apr 20 14:48:47 MSK 2015 x86_64 x86_64 x86_64 GNU/Linux
2、安装ShadowSocks
# yum install python-setuptools && easy_install pip
# pip install shadowsocks
3、创建配置文件/etc/shadowsocks.json
[root@localhost /]# touch /etc/shadowsocks.json
[root@localhost /]# vi /etc/shadowsocks.json
{
"server":"138.128.208.158",
"server_port":443,
"local_address": "127.0.0.1",
"local_port":1080,
"password":"MyPass",
"timeout":300,
"method":"rc4-md5"
}
备注:加密方式官方默认使用aes-256-cfb,推荐使用rc4-md5,因为 RC4比AES速度快好几倍。继续阅读